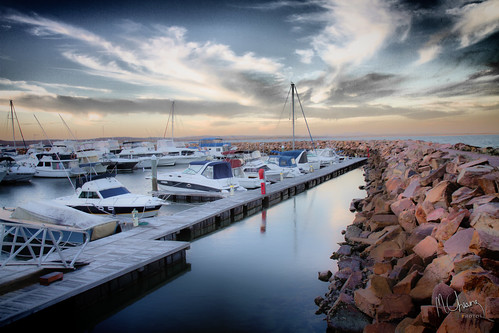
Finally, one of the rarer few photos I am proud of. Took this at a company conference at Port Stephens. I wanted to do a HDR on it. I've stocked up quite a few HDR photos but haven't tried doing one until now. Finally got around getting a software recommended by Ben called Dynamic-Photo HDR 4.7 and it's awesome!
I am a bit worried about the quality when blown up though. My boss wants to blow it up and put it in the office. Hopefully it works. I took the 3 shots freehanded so there may be some blurness when zoomed in.
Anyway, more HDR to come!
Monday, December 13, 2010
HDR Photography
Wednesday, December 8, 2010
Cleaning the 7D sensor...

... It's like performing open heart surgery!! I got some cheapo swabs from Hong Kong and tried my first had at cleaning the sensor. What a nerve wrecking job. I basically moved the dust around. The liquid on the swab left marks and I had to use something else to clean it. The sensor is still not entirely good yet. I think I'll have to go the digital camera warehouse soon to get the proper sensor cleaning kit with fitting swabs and better liquid to clean it with. Sigh...
BTW, the blower method of cleaning the sensor don't really work if you had stubborn dust... not even the rocket :(
Saturday, November 20, 2010
Peter & Melissa's Photo Shoot
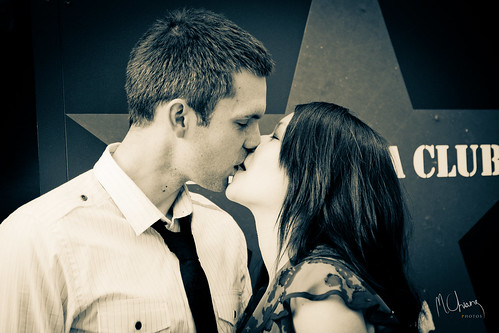
2 Months back I got an opportunity to help out a friend and photography mentor to be his assistant and second photographer. My first paid gig! I was excited but also nervous at the same time. I don't think I've got the skills yet, but I went and helped anyway. Holding a reflector or diffuser can't be that hard ;)
Anyway, I got back my RAW photos and looked at it on the screen for the first time. 300+ shots of my own and only 1 is "somewhat" ok to keep. I was a little disappointed. Although I have to remind myself that I'm there to learn and that he has taken all the directed and official shots. I was supposed to take interactions. But even those seemed bad :(
I am very keen to see how Chi's photos turned out and what the end product is. Hopefully at least 1 or 2 of mine gets into the delivered stuff...
What did I learn that day? I learnt to use a reflector, a diffuser and off camera flash. I know that these are basics, but at least I get to practice it on that day. Also confirmed that the hardest part of the gig is not technique but the ability to engage with the client and get the right poses that brings out the best in them without it looking too posed or fake. Chi was pretty good at directing.
I guess there is only one way to improve, and that is through practice... Anyone care to be my guinea pig subjects? :P
Saturday, October 2, 2010
Taking lots of photos...

I've had a holiday back in Singapore and over the past month I have had a great time taking photos. Let's see... I took:
1. Mikaela's 2nd Birthday
2. Desmond's Bachelor party
3. Desmond's pre-wedding outdoor shoot
4. Desmond's wedding
5. Callum's 1st Birthday
6. Chi's job to do a couple's outdoor shoot (First paid gig!!)
7. Harry, Kyla and Kaelynn's 1st Birthday
Wow 7 great photography treats! Hence the photo :P
I learnt heaps and will try to post learnings so I don't forget them soon.
Monday, September 6, 2010
Panasonic Lumix GF1
Tried out Desmond's micro four thirds camera at his wedding bachelor and hens night party at Singapore Power House - Dragonfly. I initially wanted to bring all my gear to try out concert photography but was convinced not to as it's too bulky :-P
Good thing too. Got to try out a new camera. The series wasn't that bad. ISO suffered a bit. Although the camera can go to 3200, 1600 is the max I would go at it. Also without a flashgun, I felt a little handicapped. I used the built in flash in some occasions.
Monday, August 30, 2010
Portrait Experiments

I just decided one day to experiment with my 'O Ring flash attachment in combination with the f/1.4 50mm prime lens with a fish eye attachment on the front. My idea was to get the "Lie to Me" TV series show's portrait shots effect. You know the ones on the wall of the Lightman Group's office. They had white light and the face was very illuminated.
So... The general idea was (based on memory now):
1. O Ring attachment strapped onto my 430ex Flash gun on the camera
2. Fish eye attachment on the prime lens brings the lens to an approximate 40mm mark
3. f/1.4 becomes unusable with this attachment. I set AV to f/2.0 (f/2.2 is better on controlling the "blurness")
4. EV -1
5. Flash set to +0.5 (... I think... or at 0... this is to compensate for the flash going through mirrors and getting absorbed)
This set up is overall quite effective for close up portraits. Not sure if it'll work as well for half body or full body. I don't think so, unless there was a softbox to boost light. Also depends if done in studio or using natural light through window.
Another brainwave was to use my iPad's studio light settings... I got an app the emulates a softbox :-P Will post if I successfully pull if off with iPad as the side-light source...
Sunday, August 15, 2010
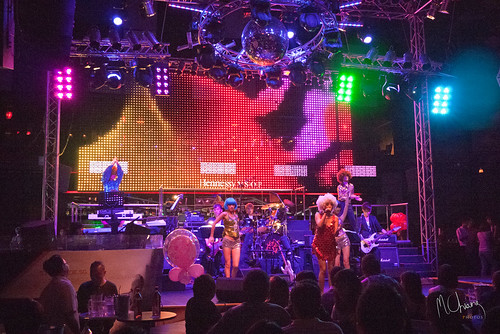
Conference Event Photography
My biggest nemesis. Taking indoor events are my greatest struggle. I did ProcessDays 2010 this year as a back up photographer and I was somewhat happy with myself. However, the colors were still off and in some cases the lights weren't as good as well.
This shot was my favourite. I borrowed the pro photographer's light box on the left and I used an "assistant" holding a diffused flash on the top right and I fired of the shot remotely. I later used lightroom to make it B&W.
A few lessons learnt during and after the event (thanks Chi!):
1. I like to use AV set to -2 when flash is diffused and bounced off a card at an angle forward. This is for places where ceilings are too high.
2. Chi suggested to bounce off walls. Seemed to be better on the shadows made. Will try next time.
3. Learnt something about the light boxes too. The pro photographer was using a grid looking attachment on the front. Apparently with that it makes a punchier portrait.
4. Multiple colors in the venue does crazy things to the white balance :(
5. Set drive mode to high and always take at least 3 to avoid blinking and funny gestures of the people.
I'll keep trying...
Sunday, July 11, 2010
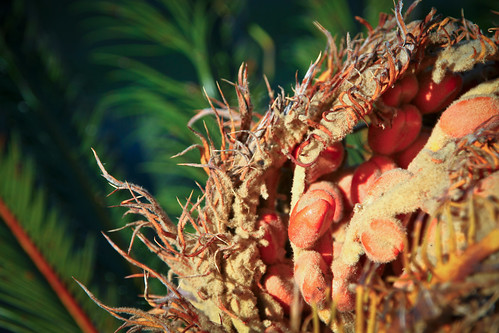
Macro Photography
I just ordered from eBay a macro flash "O" ring that fits my 430ex II. So basically my "cheapo" macro setup are all compatible attachments:
1. Canon 50mm f/1.8 USM with a macro filter attachment (doubled with a wide-angle add-on for normal use to make an effective range of 40mm - much better for portraits)
2. Flashgun extension that channels light from my 430ex through the "pipes" to an "O" ring extension that latches to the front of the lens.
3. My monfrotto tripod.
The flash is still on its way, but its a good $40 as compared to $300 that I'd normally have to fork out.
Will take some close ups soon.
Sunday, July 4, 2010
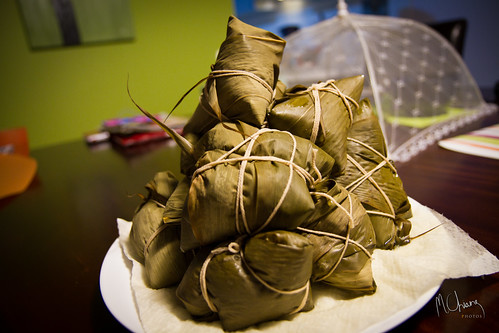
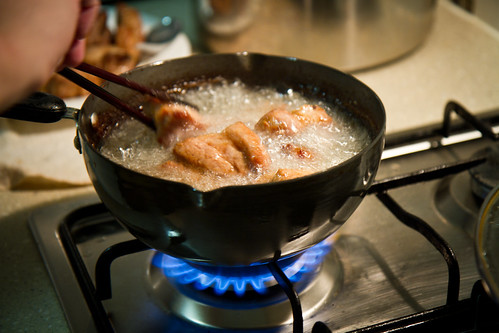
Taking & Making the "Bak Zhang"
I couldn't think of anywhere else to put my notes on this one so I decided to put this here. It is not entirely non photography related. I did learn one thing:
The low lamp of our dining table actually makes quite a good "studio-styled" lighting.
Ok back to the Bak Zhang. I learnt this from my grandma 3 times in the past and have always been too lazy to make it. Today I had a craving and decided to make it. This one is unique and only my grandma makes it this way. That is why I had to do it myself and cannot buy it... So here are my notes to myself so I don't forget if I decided to do it again:
1. Must soak the glutinous rice overnight with salt.
2. Then drain and mix with "more" oil and sesame oil, salt and also five spice
3. Marinate the fatty pork (belly) with five spice, salt, sesame oil and soya sauce.
4. Green bean, with five spice and salt
5. Chestnut
6. Salted egg yolk
7. Bak Zhang leaf and string (bamboo leaf I think)
8. Boil for 3-4hrs (More salt in the pot - more than 2 teaspoons of salt)
How to wrap here: http://www.youtube.com/watch?v=4-bC4ot5Uec&feature=PlayList&p=FDDBF1BEDC211038&playnext_from=PL&playnext=1&index=23
Thursday, July 1, 2010
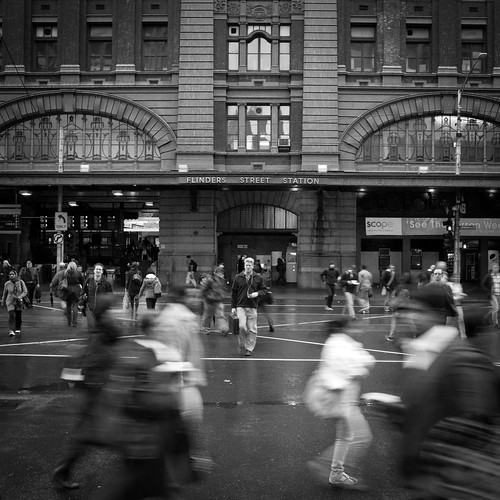
Black & White + 1:1 frame formats
I started a little mini series to take shots of cities and citiscapes in monochrome and mainly black and white. This one was taken on a rainy Melbourne morning to try and capture the Melbourne city mood going to work. I also tried to experiment with the "square" format 1:1.
Lessons on B&W:
1. Never use the preset black and white on the camera. Always do the change in post processing.
2. I did this with a blue filter on to add the dynamics...
And it got featured in Redbubble.com!
http://www.redbubble.com/people/brokenvase/art/5460297-1-i-take-the-train-to-work
Lessons on B&W:
1. Never use the preset black and white on the camera. Always do the change in post processing.
2. I did this with a blue filter on to add the dynamics...
And it got featured in Redbubble.com!
http://www.redbubble.com/people/brokenvase/art/5460297-1-i-take-the-train-to-work
Monday, June 28, 2010
Loving my Telephoto lens!

This shot was taken while on a family/business trip to Melbourne at the city China Town. I'm loving my 70-200mm lens at the moment! This shot proves it...
Monday, June 21, 2010
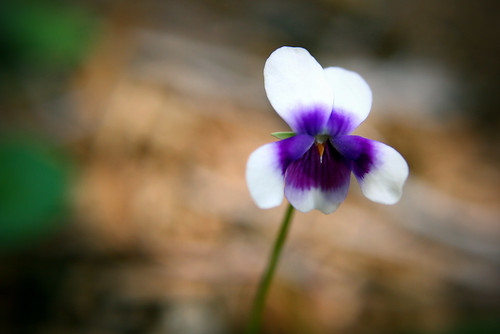
Canon EF 50mm f/1.4 USM with Wide-angle/Macro filter on
I took this with my newly acquired (second hand, thanks Kev!) 50mm prime lens. I made a tweak to the lens configuration by putting on one of those wide-angle/macro filter attachments Desmond gave me. It brings the lense to a more palatable 40mm and when the front attachment is off, it turns into a pretty decent macro lense.
I can visibly see any loss in quality. Only downside is that if I go down to f/1.4 the focus is so soft that it is often not usable. This was taken at f/1.8 and is still pretty decent. I found that the sharpest starts at f/2.8.
I did some tests on my MechWarrior figurines. Will post the test shots if I ever get to it...
Saturday, June 5, 2010
Finding myself in Black & White

I found myself doing more and more black and white renderings lately. Maybe I should read up more on them. I think it's a unique view of things. Forces me to look at the subject and story more than the colors of the frame.
Also, I've finally gotten my 17-55mm "utility" lens and also my got the 70-200mm telephoto lens a few days back. My set is nearly complete. All I need now is a good wide aperture portrait lens with a way to do macro shots and my kit is complete for a while.
I also got a cool Monfrotto strap for my tripod that sticks to one leg and can be used to sling over my shoulder. Very good indeed!
Tuesday, June 1, 2010
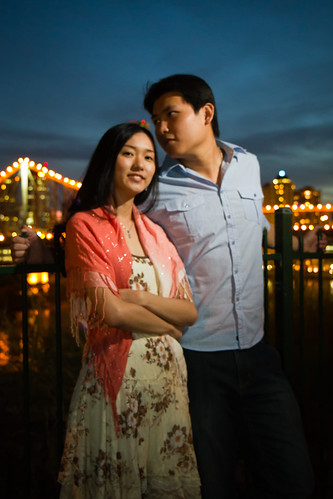
David & Anne Night Shoot Setup notes
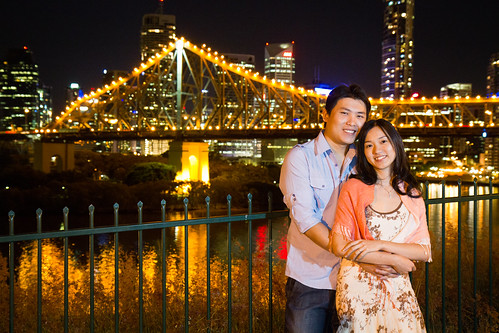
I wasn't intending to post this. But since Desmond asked me how I did it, and I wrote it up in the facebook comments. I decided to post this to keep a record...
Photographer's comments:
Because the sun has gone down way below the horizon and there is no more light, this shot was tricky.
1. I had to use wireless flashgun placed to the right of the frame with a diffuser and a poker card attachment to bounce light.
2. My flash stand was a cheapo one, so it was placed only at same height as subject. Should have been higher.
3. Mounted camera on my better tripod (the monfrotto)
4. Camera set to remote trigger (from memory) build in flash was -1 stop. Flashgun was +1 stop.
5. Camera setting was then finally set after metered reading at AV mode, to f/4.0, 0.3s shutter, ISO 3200 at 31mm focal length.
6. I fired many shots. Mainly because I wasn't the exclusive photographer there and it was hard to get attention. The tricky part is to get them both to stay still and open their eyes... Naturally! :P
Finally note on location: It's not the best. Would have liked to loose the fences...
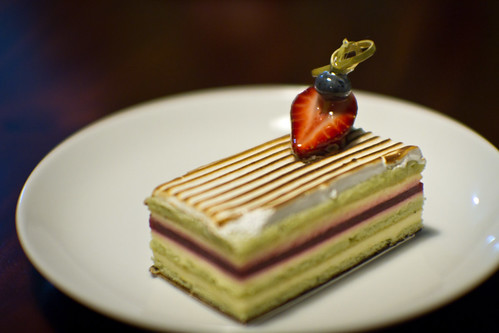
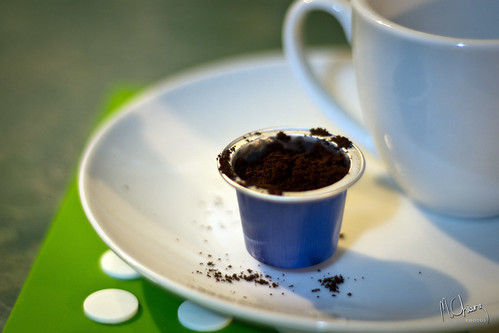
Aperture Size Does Matter
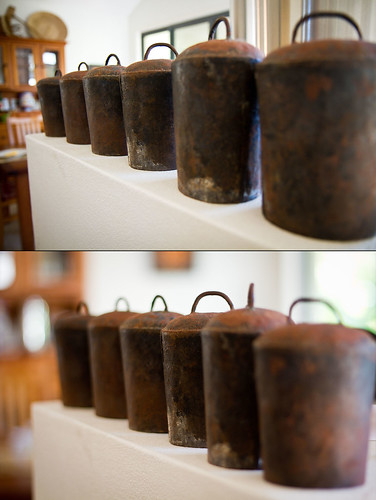
I was talking to Kev about the coffee pod shot I took a while ago and he mentioned that there wouldn't be a huge difference and I should have a look at using my f/2.8 utility lens instead to take that shot. I thought to produce good "blurring" I should use the widest aperture I can find and that was f/1.8 Although I was complaining about its sharpness.
In my quest to convince myself that I need a lower than 2.8 prime lens that should double up as a Macro (near impossible by the way), I want to evaluate this shot. The top one is at 2.8 and the bottom one is at 1.8. Can you see the difference?! How can I not have a less-than-2.8 prime lens?
But I don't want to carry around a prime portrait lens and another Macro... hmm... I may have a solution, but it would compromise the macro quality. And that is to use those cheapo filter add-ons from HK/China. Will test them out soon!
More Lessons from David & Anne's Photo Shoot
A few more lessons before my little brain forgets all again!
1. Sharpness isn't everything (thanks Kev :P)
2. Move my butt. I was looking at the others, some great angles I can't even see
3. Wireless flash on portraits should be at side angle and higher than subject. Low angled flash is has a more dramatic and scary look.
4. Posed shots almost always look slightly less natural (pointed out by Kev)
5. Lazy mirror lock technique. Focus, switch off AF, live view, remote shutter click (hehehe)
Thanks all I can remember. Hope I didn't miss anything.
Sunday, May 16, 2010
David & Annie Photo Shoot
Thought I'd write down my experience on my first semi-serious photo shoot outing.
Background:
David and Annie are from church and has graciously agreed to be our "guinea pig" models for our photography outing. We met at 3:30pm and went to Roma Street Parklands and later for night shots at a lookout towards Story Bridge.
Gear I brought:
1. My camera (duh!) Canon 7D
2. Primarily used Dan's 17-55mm f2.8
3. Borrowed Chris' Sigma 24mm f1.8 Prime
4. Ex 430 Flashgun
5. Diffuser on flashgun with rubber band and poker card attachment!
6. Monfrotto tripod
7. Cheapo second tripod for flashgun
8. Water bottle with water in it
9. Spare batts
Will use a separate post for the lessons I learnt as this will be long and also it's getting late at point of writing.
Saturday, May 15, 2010
Addicted to Post Crop Vignetting
I think I'm addicted to digitally enhancing the photos with simple vignette effect of at least -15 in Adobe Lightroom! Don't know if its a good or bad thing. In this photo, the vignette is actually at -30!! I will not go down lower though. It will look unnatural otherwise.
Thursday, May 13, 2010
Limitation of the Canon 50mm f1.8?
I used a stand, set ISO to 200 and connected a cable. This was taken f1.8 at 1/6 speed. So ideally this one should be clear, but it is not at 1:1... It's so disappointing... I guess you match price with quality. This lens costed $120 :)
Monday, May 10, 2010
My wishlist for my kit bag

Just spent 2 hours researching on the internet on my "affordable" wishlist for my Camera gear. I currently have:
1. Sigma 18-200mm f3.5-6.3 DC
2. Canon 50mm f1.8
3. Canon 18-55mm f3.5-5.6 Kit lens (with Macro and Wide angle cheat filter attachments)
So including all the UV filters and CPL filters and shipment, this will cost me close to $3k AUD. Hmm... wonder when my gear bag will be filled. At the moment, I am happy with just the 17-55mm f2.8 on loan from Dan. Thank Dan!!

Saturday, May 8, 2010
Minor lesson learnt about RAW vs. JPEG
Another thing I learnt and thought I'd write it down. I found in lightroom, I got more flexibility with cleaning up whitebalance and exposure with RAW than with JPEG. I know that's quite a no brainer as many books would have said this. But to feel it first hand when doing post processing makes a difference.
Now I'm back to my dilemma on which to use as my standard for taking photos :(
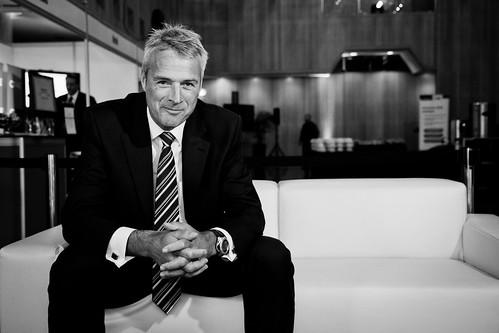
Grunt Event May 2010 - Studio Photo Shoot
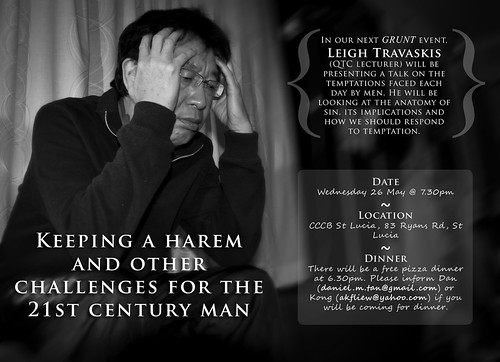
I jumped at the idea of Kat's suggestion to do a photo shoot of my dad for the Grunt event at church. Dan needed to show a stressed out man. :) So I just let my created juices flow again after 4 years of not doing these things. Here's what I did...
1. I setup my old stand with my EX 430II Flashgun on diffuser -1 stop set to wireless trigger and positioned it at dad's face level on the left of the frame
2. Set manual exposure to f4.0 1/60 ISO800 with built-in flash at -1 stop
3. Mounted camera on my main camera stand set to low angle
4. Took 22 shots of my dad with some free hand held ones
5. Used Lightroom to adjust exposure up by +0.6, increased dark and contrast. Vignette to -20 and cropped it to get a 4:3 ratio instead for the PPT, and Flyer formats to be better.
6. Used Picasa's soft focus effect on my dad's face, hands and body
7. Used photoshop to duplicate layer, made right background blur (didn't have a better studio setup, background was ugly shelves, but worked out well as the blurred background gave some texture for the words later)
8. Made photo black and white and adjusted the color concentration levels
9. Did the layout of the text to finish.
I felt quite good in a way because it was almost nostalgic to design again! Danger is that it is addictive!
Tuesday, May 4, 2010
CCCB Church Camp Post Processing
Well, I've done 227/1000+ so far and have taken a lot more other photos since then. Will keep on chipping away. It's rewarding though to see that not all my photos are that bad. Learnt quite a bit from this experience as well.
So far I can't say that I've stabilized by post processing workflow. I can't seem to get the right mix. Sometimes I go for a more contrast feel and at other times I don't and the photos look less rich. I can't get a consistency I want on all my processes photos. As Ben says "that's my style", I find that my "style" is not fixed yet.
I've also managed to borrow Dan's 17-55mm f2.8 IS USM. It's great! Faster focusing and the images are sharp as ever! My success rate at taking Mikaela in action has greatly improved. So tempted to buy it :( Can't afford it at the moment. Will have to extend my loan period with Dan.
Another thing I learnt recently, still trying to perfect it, and that is flash indoors. Especially in a restaurant table environment. I kind of picked it up from Steve as he used my camera during camp when his batts ran out. Combo is something around lowering the exposure by 1-2 stops in AV mode and setting flash exposure from +0-1 stops. Also important to set slow sync on, that is for flash to go off at second curtain. This would stop trailing. Will post up an example soon.
Tuesday, April 27, 2010
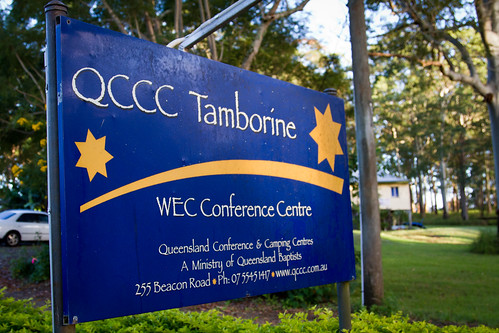
Church Camp 2010
Just came back from a rewarding church camp up and Mt Tamborine. I was asked to take photos for camp and was very nervous getting into it. To prepare I:
1. Studied to program
2. Borrowed a friend's 24-105 f4L IS USM lens
3. Read up on how to take photos at low light
4. set my camera to strong ISO noise reduction
5. Set to take RAW
In the end I took 1600+ photos!! Post processing would be fun!
Anyway, I'm tossing between getting a new lens. It's 17-55mm f2.8 IS USM vs. 24-70mm f2.8L USM at the moment and am coming down to this...
Canon 17-55MM f2.8 IS USM
Pro: Clarity and wide angle
Con; Build quality and potential dust sucking
Canon 25-70mm f2.8L USM
Pro: Clarity and build quality
Con: no as wide angle and no IS
Will borrow from a friend the 17-55 and probably rent the 24-70 to compare and try before I decide.
Thursday, April 22, 2010
First blog entry

I thought I'd start this blog by posting up my current love of my life (besides my wife of course). I want to start this blog and keep this as a journal more for myself on my photography journey and personal notes-to-self stuff so I can remember them! I'm getting old and my little brain can't keep up!
Subscribe to:
Posts (Atom)